
Table of Contents
- 1. Clear Snow and Debris from the Outdoor Unit
- 2. Set Your Thermostat for Optimal Heat Pump Performance
- 3. Follow a Heat Pump Maintenance Checklist for Winter
- 4. Use Fan and Swing Settings to Improve Air Distribution
- 5. Manage Ice Buildup and Understand the Defrost Cycle
- 6. Know When to Call a Professional for Heat Pump Efficiency
- 7. How to Reduce High Energy Bills with Smart Strategies
- Frequently Asked Questions
Last Updated: September 14, 2026
1. Clear Snow and Debris from the Outdoor Unit
Improving heat pump efficiency in winter starts with the outdoor unit: a buried or blocked coil cannot absorb heat from the air. At Anthony & Son Indoor Air Quality, LLC, we tell homeowners the same thing every January, the unit needs breathing room.
Heat pump efficiency depends on unobstructed airflow across the outdoor coil. When snow, ice, or leaves block the cabinet, the system works harder to move the same heat.
Clear at least two feet around the unit and keep the top grille free of snow. Never cover it with a tarp or plastic, that traps moisture and accelerates ice buildup. Use a broom, not a shovel; a shovel blade bends the delicate aluminum fins, and bent fins restrict heat transfer permanently.
After a heavy storm, check again, drifts and roof avalanches bury outdoor units hours after the snow stops.
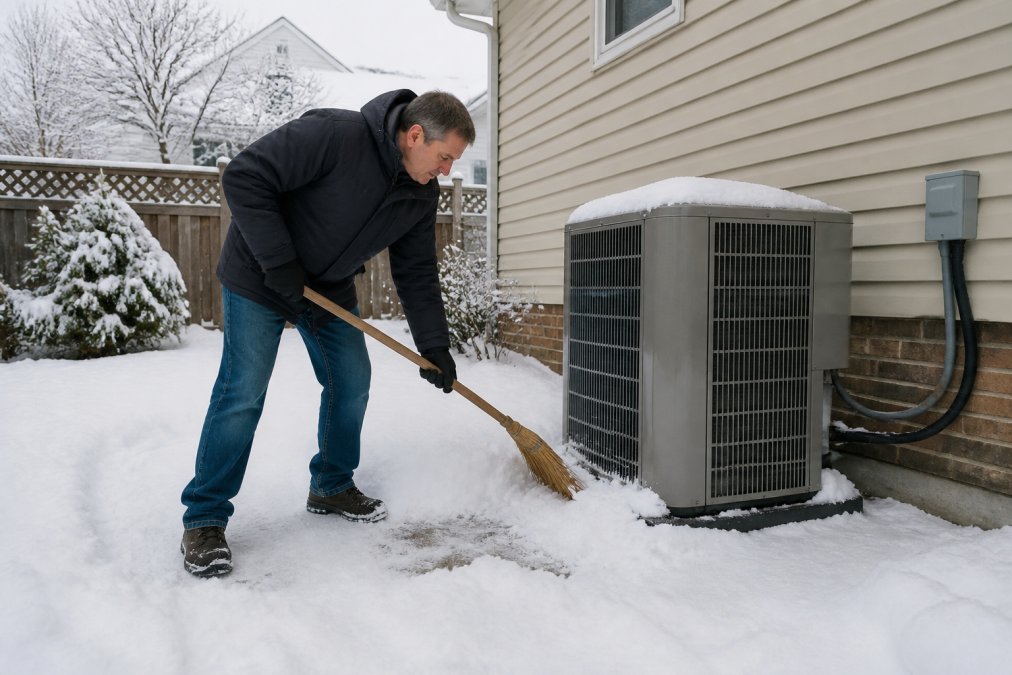
Never chip ice off the outdoor unit with a screwdriver, ice scraper, or hammer. The refrigerant coil sits millimeters behind the fins, and a puncture means a refrigerant leak, a dead system, and a repair bill that runs into the hundreds.
2. Set Your Thermostat for Optimal Heat Pump Performance
The best thermostat setting for a heat pump in winter is a single, steady temperature held within a degree or two, day and night. Heat pumps run most efficiently maintaining a setpoint rather than recovering from large setbacks. Most guides skip why setbacks backfire and how to configure your thermostat so they stop.
Why setbacks trigger expensive auxiliary heat
This trips up people who grew up with gas furnaces. A furnace blasts back from a 10-degree setback in twenty minutes; a heat pump cannot. When the thermostat calls for a large jump, the compressor can’t close the gap fast enough, so the thermostat energizes the auxiliary (backup) heat strips, resistive electric heaters that consume far more electricity per unit of heat than the compressor. That “energy-saving” setback costs more.
A common pattern: a homeowner sets back 8 degrees overnight, morning recovery runs the strips for 45 minutes, and the day’s utility cost climbs. The setback didn’t save energy, it moved the work to the most expensive equipment in the system.
Configure the thermostat, don’t just set it
Most modern heat pump thermostats control how aggressively the system recovers. Look for these in the installer or advanced settings menu:
- Compressor lockout / aux heat lockout: Prevents the strips from running until outdoor temperature drops below a threshold you set (often the 20s to 30s Fahrenheit). This is the highest-impact setting for winter bills.
- Adaptive or smart recovery: The thermostat learns how long the heat pump takes to reach setpoint and starts recovery early using only the compressor, what makes a modest setback safe.
- Balance point: The outdoor temperature at which the heat pump can no longer keep up and the strips take over. Your installer sets this during commissioning; if it’s wrong, you’ll run strips on days the compressor could have handled.
- Heat pump vs. emergency heat mode: Confirm the thermostat is in normal heat pump mode, not emergency heat, which runs strips exclusively and is meant only for a compressor failure.
If your thermostat doesn’t expose these settings, it may not be designed for heat pump control. A heat-pump-specific smart thermostat will.
The smart thermostat angle most guides miss
Smart thermostats earn their cost in winter by automating the decisions above. Capabilities worth using:
- Outdoor temperature lockouts that disable aux heat above a set outdoor temperature, so a manual setback mistake can’t trigger strips.
- Runtime and aux-heat tracking in the app, showing how many hours the strips actually ran. If that’s more than a small fraction of total heating hours, your settings or equipment need attention.
- Geofencing with a shallow setback, 2 to 3 degrees, not 8, so the system recovers on the compressor while you’re away.
- Peak-hour adjustments that pre-heat slightly before a utility peak window and coast through it, pairing well with time-of-use rates.
Set your thermostat to a comfortable temperature and leave it. For a cooler bedroom, adjust dampers or close vents rather than dropping the whole-house setpoint overnight. If you do want a setback, keep it shallow and make sure the thermostat recovers with the compressor, not the strips.
3. Follow a Heat Pump Maintenance Checklist for Winter
A simple heat pump maintenance checklist catches small problems that quietly drain efficiency before they become repair calls. Run through it monthly during heating season.
- Replace or clean the air filter every 1-3 months, more often with pets or heavy dust (HVAC Proper Installation of Filters)
- Clear snow and debris from the outdoor unit after every storm
- Check that the outdoor fan spins freely and isn’t caked in ice
- Inspect the indoor air handler for frost or water pooling
- Confirm the thermostat batteries and settings are correct
- Listen for unusual noises: grinding, rattling, or repeated cycling
- Check the condensate drain line for clogs or ice
- Look at the outdoor unit’s base; it should sit level and above the snow line
The air filter is the single most overlooked item. A clogged filter starves the system of airflow, raises energy consumption, and can freeze the evaporator coil (energy.gov). Most homeowners replace filters far too rarely.
Write the filter size on a piece of tape stuck to the air handler. Next time you’re at the store, you’ll know exactly what to buy without pulling the old filter out and measuring it in the cold.
4. Use Fan and Swing Settings to Improve Air Distribution
Fan and swing settings control how conditioned air moves through your home, and getting them right fixes the “some rooms are freezing, others too hot” problem in older houses, one of the cheapest efficiency wins available.
For ductless systems, set the swing to oscillate rather than locking the louver in one position. A fixed louver dumps heat in one direction, leaving corners cold; oscillation spreads warm air and reduces the floor-to-ceiling temperature difference.
Fan speed matters too. On mild days, a lower fan speed lets air linger over the coil longer, improving heat transfer and comfort. On very cold days, a higher fan speed pushes more air but feels cooler at the register. Find the balance your home likes.
If certain rooms stay cold no matter what, the problem is usually air distribution, not the heat pump. Unbalanced ductwork, closed registers, or a poorly sized system leave hot and cold spots even when equipment runs perfectly. A technician can measure static pressure and airflow to find where the air goes.
5. Manage Ice Buildup and Understand the Defrost Cycle
Some ice on the outdoor unit is normal. A heat pump runs a defrost cycle to melt frost off the coil; during it you may see steam rising or hear what sounds like cooling mode. That is the system working as designed.
The defrost cycle is a programmed sequence where the heat pump briefly reverses refrigerant flow to warm the outdoor coil and melt accumulated frost. It typically runs for a few minutes, then returns to heating.
What is not normal: thick ice that never clears, ice climbing up the cabinet, or a unit stuck in defrost for long stretches. Those point to a refrigerant charge issue, a failing defrost sensor, or a reversing valve problem. Persistent ice forces the compressor to work against a blocked coil, tanking efficiency and shortening its life.
Cold climate performance has limits. As ambient temperature drops, heating capacity and COP (Coefficient of Performance) both fall, because there is less heat in the outdoor air to transfer indoors. Modern cold-climate heat pumps handle far lower temperatures than older models, but every system has a point where backup heating takes over.
U.S. Department of Energy heat pump guidance
6. Know When to Call a Professional for Heat Pump Efficiency
Call a professional when ice won’t clear, the system runs constantly without reaching setpoint, or auxiliary heat runs for hours. Those signal a refrigerant, sensor, or compressor problem no homeowner maintenance will fix. But “call a pro” is where most guides stop, the useful question is what the technician actually checks, and how you know the visit paid off.
What a winter heat pump diagnostic actually covers
A competent winter service call is not a filter swap. It is a set of measurements:
- Refrigerant charge via superheat and subcooling. An undercharged system loses capacity and frosts the coil; an overcharged one raises compressor amp draw. Both tank efficiency, and neither is visible to the homeowner.
- Defrost board and sensor function. The technician forces a defrost cycle and times it. A stuck sensor or failed board leaves ice on the coil, forcing the compressor to work against a blocked heat exchanger.
- Airflow measurement (static pressure and temperature rise). Low airflow from a dirty coil, undersized duct, or collapsed flex run starves the system and can freeze the indoor coil. Static pressure tells the technician whether the ductwork, not the equipment, is the problem.
- Auxiliary heat amp draw. If strips pull more current than nameplate, or run when they shouldn’t, the technician traces it to the thermostat, lockout setting, or a stuck sequencer.
- Reversing valve operation. A valve that doesn’t fully seat bleeds capacity between heating and cooling modes.
Ask for the readings, not just a verdict. A technician who hands you superheat, subcooling, static pressure, and amp draw numbers is doing the job. One who says “it’s running fine” without them is guessing.
Build a cost-tracking habit so you know if it worked
Efficiency work is only real if the bill moves. Before your next service call, establish a baseline:
- Pull 12 months of utility bills and note kilowatt-hours per month, not just dollars. Rates change; usage is the honest number.
- Normalize for weather using heating degree days from a local source, so a mild February doesn’t look like a win.
- Log thermostat runtime and aux-heat hours weekly from your thermostat app, the leading indicator; the bill is the lagging one.
- Compare the same month year over year after a tune-up, envelope fix, or thermostat change. A 10 to 15 percent drop in winter kilowatt-hours for the same weather is meaningful.
If usage doesn’t move after a service call and thermostat reconfiguration, the problem is likely the envelope or equipment sizing, not maintenance, the point at which a load calculation and duct evaluation are worth the money.
Routine professional inspection matters too
A technician can check refrigerant charge, test the defrost board, measure airflow, and clean components you can’t safely reach. An annual tune-up catches small issues before they become winter emergencies. Schedule it in the fall, before the first hard freeze, so any parts arrive before you need them.
At Anthony & Son Indoor Air Quality, LLC, our certified technicians handle heat pump repair, preventative maintenance, and full system installation for homes and businesses. If you’ve had air quality complaints in a commercial building or hot and cold rooms in an older home, we diagnose the airflow and envelope issues behind them rather than guessing at equipment.
If your auxiliary heat runs more than a few hours a day in normal winter weather, something is wrong. That’s a diagnostic signal, not a setting to live with. Track aux-heat hours weekly, and treat any sustained increase as a reason to call, not a reason to wait for a breakdown.
7. How to Reduce High Energy Bills with Smart Strategies
The fastest path to lower energy bills is fixing heat loss, not just tuning the heat pump. A perfectly efficient system still wastes money if your home leaks warm air through the attic, windows, and rim joists.
Start with the home envelope. Seal air leaks around doors, windows, and where pipes and wires penetrate exterior walls, and add attic insulation if it’s thin. A tighter envelope means the heat pump runs less, and every hour it doesn’t run is money saved. Many utilities offer rebates for insulation and air-sealing, so check before assuming it’s out of reach.
Smart home integration is the second lever. Smart thermostats track runtime and shift the setpoint based on occupancy and outdoor temperature, and some energy-monitoring apps break down heating costs by day, showing which habits drive your bill. Once you see the cost of auxiliary heat, you’ll stop triggering it.
Then look at the equipment. An aging heat pump with a failing compressor burns more energy than a properly sized modern unit. If your system is past its service life and repairs are stacking up, replacement may cost less over the next few years than limping along.
| Problem | Likely Fix | Where to Start |
|---|---|---|
| Snow-blocked outdoor unit | Clear two feet around the cabinet | Monthly, after storms |
| Clogged air filter | Replace every 1-3 months | Check monthly |
| Constant auxiliary heat | Check thermostat mode, call a tech | Before the next cold snap |
| Cold and hot rooms | Balance airflow, inspect ducts | Professional airflow test |
| High bills, old system | Seal envelope, consider replacement | Annual inspection |
Winter puts every heat pump to the test, and the systems that hold up get attention before the cold arrives. If your unit is icing over, running on backup heat, or leaving rooms uncomfortable, don’t wait for a breakdown mid-cold snap. Anthony & Son Indoor Air Quality, LLC provides heat pump repair, preventative maintenance, and system installation backed by certified technicians and honest, transparent pricing. We’ll diagnose the real cause, airflow, refrigerant, or your home’s envelope, and recommend the fix that solves it. Contact us today to schedule your winter heat pump inspection and keep your home comfortable all season.
Frequently Asked Questions
How cold is too cold for a heat pump to work?
Heat pumps can operate in temperatures as low as -13°F, but their efficiency drops as it gets colder. Below 30°F, many systems rely on auxiliary heat, which uses more energy. Cold climate heat pumps maintain better performance in extreme cold. If your system struggles below 20°F, a professional can assess if upgrades or backup heating are needed. Regular maintenance helps your heat pump efficiency in winter.
How many hours a day should a heat pump run in winter?
A heat pump should run continuously to maintain a steady temperature, but it may cycle on and off depending on outdoor conditions. In winter, it’s normal for the system to run longer to meet heating demand. If it runs nonstop without reaching the setpoint, check for airflow obstruction or refrigerant issues. A programmable thermostat can help balance runtime and energy consumption.
What is the 20 degree rule for heat pumps?
The 20 degree rule suggests setting your thermostat no more than 20 degrees above the outdoor temperature to avoid relying heavily on auxiliary heat. For example, if it’s 30°F outside, set your thermostat to 50°F or lower. This reduces strain on the system and keeps energy bills down. However, modern heat pumps can handle larger differences, so consult your manual or a technician.
Does changing the air filter improve heat pump efficiency?
Yes, a clean air filter improves heat pump efficiency by ensuring proper airflow. A clogged filter restricts air, forcing the system to work harder and use more energy. Check your filter monthly during winter and replace it every 1-3 months, depending on usage and pets. This simple task is part of any heat pump maintenance checklist and can lower heating costs.