
Table of Contents
- Why Ductwork Sealing Matters for HVAC Performance
- Signs of Leaky Air Ducts You Should Not Ignore
- How Duct Sealing Improves Energy Efficiency and Comfort
- Duct Mastic vs Foil Tape: Which Sealant Works Best?
- Step-by-Step Ductwork Sealing Process
- Average Cost of Duct Sealing and What Affects It
- DIY vs Professional Ductwork Sealing: Safety and Results
- Frequently Asked Questions
Last Updated: September 10, 2026
Why Ductwork Sealing Matters for HVAC Performance
Ductwork sealing is the process of closing gaps, cracks, and loose joints in your home’s air distribution system so conditioned air reaches the rooms it’s meant to heat or cool. A surprising amount of the air you pay to condition never makes it past the basement.
Here’s the uncomfortable truth most homeowners never hear: your ductwork can look perfectly fine from the outside while quietly bleeding air at every seam.
The U.S. Department of Energy’s Energy Saver guide to duct sealing notes that leaky ducts are one of the most common and most overlooked causes of high energy bills. When supply ducts leak, you lose the air you already paid to cool. When return ducts leak, you pull in unconditioned air from attics, garages, and crawlspaces instead.
That second problem is the one nobody talks about, and it’s often worse than the first.
Return-side leaks pull attic air, insulation fibers, and crawlspace moisture straight into your living space. Fixing supply leaks saves money; fixing return leaks also protects your indoor air quality.
Signs of Leaky Air Ducts You Should Not Ignore
The clearest signs of leaky air ducts are rooms that never reach the thermostat setting, dust that returns within a day of cleaning, and utility bills that climb without a matching change in weather. A whistling or hissing sound near vents is another giveaway.
Watch for these specific signals:
- Rooms farthest from the air handler stay hot in summer and cold in winter
- Visible dust streaks around supply registers
- Flexible duct that sags, kinks, or has disconnected at a joint
- A persistent musty or dusty smell when the blower fan runs
- Static pressure that feels weak at some vents and strong at others
If two or more of these sound familiar, the problem is almost certainly in the ductwork, not the equipment itself.
How Duct Sealing Improves Energy Efficiency and Comfort
Sealing duct leaks reduces the volume of conditioned air you lose before it reaches a room, which lowers run time on your heating and cooling equipment. Shorter run times mean less energy consumption and less strain on the compressor, blower fan, and heat exchanger.
The comfort side matters just as much as the savings. Leaky ducts create pressure imbalance: some rooms get starved of airflow while others get flooded. Sealing the duct joints and seams restores balanced air distribution, so temperature consistency improves room to room.
There’s a second benefit that rarely gets mentioned. When return ducts are sealed, your system stops drawing airborne contaminants from unconditioned spaces (energy.gov). That directly affects indoor air quality, especially in older homes where ducts run through damp crawlspaces.
Ask your technician to measure static pressure before and after sealing. A drop in static pressure tells you the system is moving air more freely, which is the real proof the work helped.
Duct Mastic vs Foil Tape: Which Sealant Works Best?
Duct mastic is a brush-applied sealing compound that cures into a flexible, permanent bond and is the better choice for most duct joints. Foil tape is a pressure-sensitive metal-backed tape that works well for quick repairs and smooth metal surfaces, but it fails faster in hot attics.
| Sealant | Best For | Durability | Notes |
|---|---|---|---|
| Mastic | Duct seams and joints | Long-lasting | Handles vibration and temperature swings |
| Foil tape | Smooth metal, quick fixes | Moderate | Adhesive degrades in high heat |
| Butyl tape | Flexible duct connections | Good | Strong seal, harder to apply cleanly |
| Mesh + mastic | Large gaps and holes | Very long-lasting | Standard for professional repair |
The common mistake is reaching for cloth-backed “duct tape” from the hardware store. It dries out, cracks, and peels within a season or two in an attic that hits triple-digit temperatures.
Step-by-Step Ductwork Sealing Process
Start by locating the leaks, then seal them in order of accessibility, working from the largest gaps down to the smallest seams. Most of the work happens at duct joints, plenum connections, and register boots, but the order in which you seal matters more than most guides admit, because every seal you add changes the pressure balance of the whole system.
What You’ll Need:
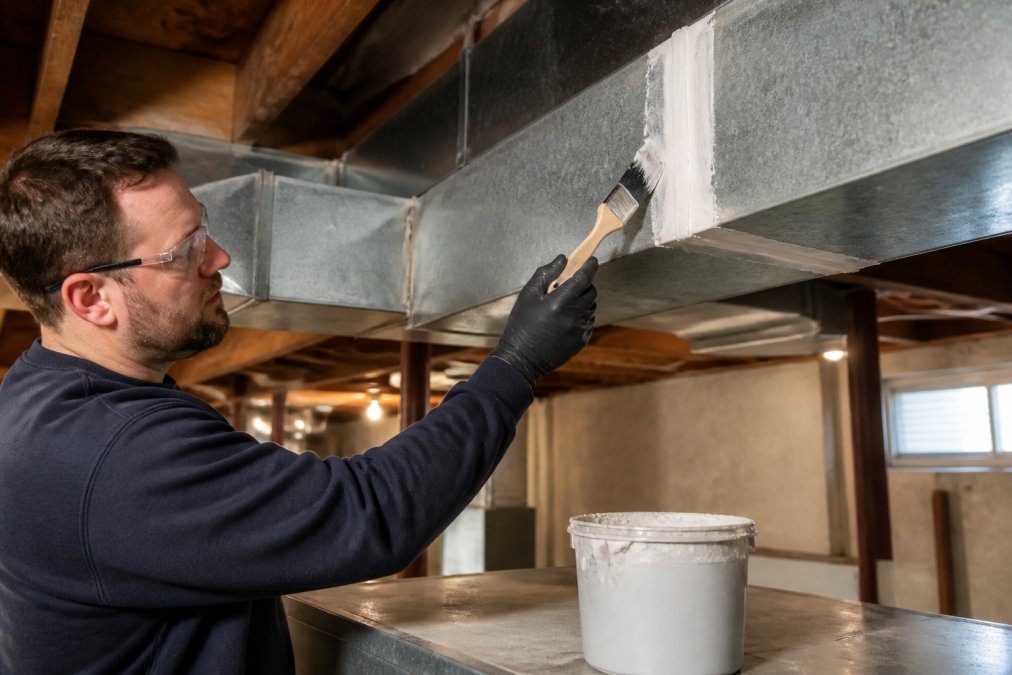
- Duct mastic and a stiff brush
- Foil or butyl tape
- Fiberglass mesh for gaps wider than a quarter inch
- Gloves, safety glasses, and a respirator rated for particulates
- A flashlight and a roll of painter’s tape to mark leaks
- A handheld manometer or a static pressure test kit (for verification)
- Inspect the full run and map the system. Trace every duct from the air handler to each register, and label each run as supply or return. This distinction drives everything that follows. Mark leaks with painter’s tape as you find them.
- Seal the plenum first. The connection between the air handler and the main trunk is usually the single biggest leak point. On the return side, this is where unconditioned attic or crawlspace air gets pulled in; on the supply side, it’s where conditioned air escapes before it ever reaches a room.
- Apply mesh over large gaps. Press fiberglass mesh into gaps wider than a quarter inch before coating. Mastic alone will sag and crack across a wide opening.
- Brush on mastic in two thin coats. A single thick coat skins over on the surface while staying wet underneath, which traps solvent and weakens the bond. Two thin coats, allowing the first to tack up, cure more reliably.
- Tape flexible duct connections, then mastic over the tape. Use foil or butyl tape at collars and takeoffs, then seal over the tape with mastic. Flex duct is the most common failure point in residential systems because the inner liner separates from the outer jacket at the collar.
- Seal register boots. The gap where the boot meets drywall or subfloor is a frequent and easily missed leak. From the conditioned side, this gap looks like a shadow; from the attic side, it’s often a finger-width opening.
- Verify with a pressure test, not a hand check. Run the system and measure static pressure at the air handler before and after. A drop in total external static pressure tells you the system is moving air more freely. Feeling for escaping air at a joint only catches the leaks you can reach.
Sealing is not a one-pass job. Each seal changes system pressure, which can expose or mask leaks elsewhere. Pros often seal, test, then re-inspect the return side specifically, because return leaks are the ones that affect both efficiency and indoor air quality.
Expected Result: Noticeably stronger airflow at distant registers, a measurable drop in static pressure, and, if return-side leaks were addressed, less dust and odor pulled into the living space.
Average Cost of Duct Sealing and What Affects It
The average cost of duct sealing depends on the size of your system, how accessible the ductwork is, and how many leaks need repair. Pricing for professional work varies widely by region, home age, and the condition of the ducts, so ask for an itemized quote rather than a flat number over the phone.
Factors that move the price up or down:
- Accessibility. Ducts in a finished basement or tight crawlspace take longer than exposed attic runs.
- System size. More ductwork means more sealing points.
- Leak severity. Disconnected runs and crushed flex duct cost more to correct than simple seam leaks.
- Duct material. Sheet metal, flex duct, and duct board each need different techniques.
- Verification. Testing before and after adds time but proves the result.
Anthony & Son Indoor Air Quality, LLC provides transparent, itemized pricing so you know exactly what you’re paying for before work begins. Reach out for a quote specific to your home.
DIY vs Professional Ductwork Sealing: Safety and Results
Professional duct sealing wins on safety and verification, while DIY work can handle small, accessible leaks if you follow proper precautions. The gap between the two isn’t skill, it’s risk, and the biggest risk is one most guides never mention.
Never enter a crawlspace or attic without confirming it’s structurally safe, free of asbestos-era insulation, and properly ventilated. Falling through a ceiling or breathing contaminated attic air causes injuries that far outweigh any savings.
The combustion safety problem nobody warns you about.
When you seal return ducts, you reduce the volume of air the system pulls from unconditioned spaces. That sounds like a pure win, until you consider that a tightly sealed return system can depressurize the house relative to the outdoors. In a home with a natural-draft gas furnace or water heater, that pressure difference can reverse the flow of exhaust up the flue (the EPA). Instead of venting outside, combustion byproducts, including carbon monoxide, can be drawn back into the living space. This is called backdrafting, and it’s the reason sealing a return system is not a purely mechanical job. A qualified technician checks for combustion appliance zone (CAZ) depressurization before and after sealing, using a manometer and a draft gauge. A homeowner with a brush and a bucket of mastic has no way to see this happening.
Other safety hazards of DIY sealing that rarely get mentioned:
- Attic heat stress. Attics routinely exceed safe working temperatures in summer, and heat exhaustion sets in faster than most people expect.
- Crawlspace air quality. Disturbed insulation and rodent droppings release airborne hazards that a dust mask won’t stop.
- Sharp metal. Sheet metal edges cut through standard work gloves; use cut-resistant gloves, not cloth.
- Access and fall risk. Joists, wiring, and recessed lights make attic floors a minefield.
Post-sealing verification: how to know it actually worked.
A visual check proves nothing. Air leaks are invisible at the seam once mastic is applied. The real test is measurement:
- Static pressure test. A technician measures total external static pressure at the air handler before and after. A meaningful drop indicates the system is moving air more freely, the clearest sign the sealing helped.
- Airflow measurement at registers. Comparing airflow at the farthest register before and after shows whether the fix reached the rooms that needed it.
- Duct leakage test. A duct blaster (a calibrated fan that pressurizes the duct system) measures leakage in cubic feet per minute. This is the standard used by energy auditors and is the only way to quantify how much leakage remains.
- Combustion safety check. For homes with gas appliances, a draft test confirms the flue is still pulling correctly after sealing.
A homeowner can approximate the first two with a handheld manometer and a cheap anemometer, but the duct blaster and combustion tests are professional tools. If you seal your own ducts and skip verification, you’re guessing.
Maintenance: seals don’t last forever.
Mastic seals hold up for years, often a decade or more in a stable, dry environment, but they are not permanent. Tape and flex duct connections degrade faster, especially after extreme temperature swings or pest activity. A reasonable inspection interval is every two to three years, or any time you notice new comfort problems, dust, or a change in utility bills. Re-inspect flex duct collars and any taped joints first, since those fail before mastic does.
If you’re weighing whether to call someone, remember that a licensed technician can find leaks you’d never spot, verify the fix with real measurements, and confirm your gas appliances are still venting safely. That last part is the one you can’t do yourself.
Frequently Asked Questions
Is HVAC duct sealing worth it?
Yes, for most homes with older or leaky ductwork. Sealing gaps in duct joints reduces air leakage, which lowers energy consumption and utility bills. It also improves temperature consistency and indoor air quality. The average cost of duct sealing varies by home size and accessibility, but many homeowners see payback within a few years through reduced HVAC strain and lower monthly costs.
What do HVAC techs use to seal ductwork?
Professionals typically use mastic sealant, foil tape with UL 181 rating, and sometimes aerosol-based sealants for hard-to-reach areas. Mastic is brushed or sprayed onto duct seams and joints for a permanent, flexible seal. Foil tape works for quick fixes but can degrade over time. The best choice depends on duct material, location, and whether the ducts are accessible.
How much does it cost to get ducts sealed?
The cost of duct sealing depends on home size, number of leaks, duct accessibility, and whether you choose DIY or professional service. Simple DIY kits cost less but may not address hidden leaks. Professional sealing includes inspection, sealing, and verification. Contact Anthony & Son Indoor Air Quality, LLC for a quote tailored to your home or building.
Can I seal my own air ducts, or should I hire a professional?
You can seal accessible duct joints with mastic or foil tape, but hidden leaks behind walls or in crawl spaces require professional tools and safety gear. DIY sealing carries risks like inadequate coverage or damage to ductwork. A licensed technician can inspect the entire system, seal return and supply leaks, and verify results with pressure testing for lasting HVAC performance.